|
If your home was built before 1970 it probably contains some lead paint somewhere.
Usually it’s found in glossy ‘trim’ paint work – doors, windows, skirting boards and picture rails. Although it can also be found in ceiling and wall paint, inside and out. Loose lead is especially harmful to children, pregnant women and unborn babies. But the lead in paint is usually only a problem if it gets released into the environment – by sanding. Hang on! Did you say sanding? Isn’t that what painters do before they re-paint glossy surfaces? Well yes, a lot do. But there are two other ways to make sure your new paint grips onto the old surface. One is to ‘de-gloss’ the surface with a chemical solution which is pretty much diluted paint stripper. This method is effective but gives off some pretty smelly vapours. A better way is to simply scrub the glossy trim with sugar soap and an abrasive pot scrubber (metal or plastic, it doesn’t matter). The Sugar soap cleans off most of the dirt and grease while the pot scrubber puts tiny scratches in the surface. You end up with a clean and very slightly scratched surface that is ready for the next step … Application of a primer designed specifically to grip. I use Taubmans 3 in 1 click here. or Zinsser B.I.N click here. https://www.bunnings.com.au/zinsser-b-i-n-3-78l-primer-sealer-stain-killer_p1565677 Either of these primers grips onto the slightly roughened surface and give a low sheen surface for the top coat to stick to. They also seal in the old paint and the lead it might contain. Your trim surface is now sealed and ready for the decorative top coat. But that’s another story… We've just had a fence built and its a beauty! So what's the problem?
Well, its a problem that comes up far too often when tradespeople do work for the general public, whether its painters or window installers or ... fence builders. The problem is that the Home Owner thinks they are dealing with a fully staffed company. Oh, how deluded we are! You see, many trade businesses today are just a string of sub-contractors. I won't bore you with the many 'fence' conversations we had with various people, suffice to say we dealt with an estimator, an owner, an office lady, the old fence removal guys, the new material delivery guys and lastly, the guy who actually built the fence. Apart from the Owner EVERY SINGLE PERSON was a new subcontractor who knew nothing about the other parts of the business. So when we had questions no one was able to answer them: that was a different department. And if you thought the Owner (whom we never met or even spoke to on the phone) might be our go-to guy, you'd be wrong! Turned out he was too busy juggling sub-contractors to talk to his customers. The best he could do was send late and garbled texts. He simply refused to speak to us! It was incredibly frustrating. I've encountered (read 'bid against') several large painting companies who don't actually do any painting! I've seen coaching videos telling owners to hire only subcontractors then DOUBLE what they pay them, to arrive at the quote. I guess if you're happy to pay $2000 for $1000 worth of work thats fine but I think its nuts! I encourage all home owners to ask 'Estimators' if sub-contractors are doing their work then ask themselves "Why not just hire my own subby?"  A few simple decisions and choices of order, can save you a lot of money when it comes to your next interior paint job. . Here are the 5 main tips to keep costs down.
1. Paint the same colour as before. Its not as exciting but you are happy with your existing colour and just want a freshen up you can save money. Why? If your painter uses the same colour you already have, he can often (but not always) paint walls with only one coat. Ceilings usually need 2 coats though. 2. Paint walls and ceiling and just sugar soap your trim. If your trim (doors, windows, skirting picture rails) are not chipped, a good sugar soap wash can make them look almost like new. And a wash is much quicker than a full paint job. 3. Paint walls and trim in the same colour. Semi gloss trim and low sheen walls look great even in the same colour. The difference in gloss levels separates the two visually. But from a painters point of view, no masking is needed, and the joins are much easier (faster) to achieve. 4. Empty rooms. Although most painters (not all) are happy to move small items out and larger furniture to the middle of the room, a completely empty room, means we can get started imediately and that saves you time and money. 5. Paint just before replacing carpets or re-sanding floor boards. Carefully masking carpet is part of the painters job, but if the carpet is going to be ripped out soon after painting, masking can be much simpler-faster-cheaper! As you can see, most cost savings are are really time savings. Talk to your painter before the job starts and you might be pleasantly surprised! 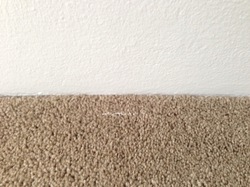 'Removing small amounts of dried paint from your carpet is as simple as it is ingenious!
(Keeping paint off my clients carpets is a big deal. I use masking tape tucked down the edges, then a 6 inch wide strip of paper, then absorbent drop sheets on the floor, then plastic wrapped around large furniture.) BUT (and I hate this) every few years a wee drop of paint gets onto the carpet. And usually it dries before Inotice. Sooooooo this is how you fix it.... Take a small par of nail scissors (the curved ones) and give the carpet a haircut. Only take off the fibres that have paint on them and take off as little as possible. The curved scissors will take a tiny dip out of the carpet and after a bit of fluffing, you'll never know. Simples! 
1. What references do you have? On a website, a hand written letter, a couple of phone numbers to call, a neighbour you can visit. A written reference or better yet a conversation is still the very best way to choose a painter. If your painter can’t provide a lot of happy customers, find one that can. 2. Who will do the actual work? Liking the trustworthy and efficient estimator, tells you nothing about who will be let loose on your home. It’s essential that the person you discuss all the details with, is the person doing (or leading) the work. 3. Is the quote fully detailed? “Paint walls and trim” is not a quote. It’s essential that you know what exactly is covered. The quote should also be a ‘Scope of Works’. It should include how much prep, what types and brands of paint, what parts of your home will be worked on and how. 4. Is the quote fixed? A quote that isn't fixed is not a quote, it's an estimate. Unless you agree to change the scope of works the quote should stay the same. 5. Are you insured? Ask to see a ‘Certificate of Currency’ and make sure its still current. 6. What is the expected timeline? Taking a few days longer to give a first class job is a good thing (with a fixed quote of course). But disappearing mid job for 2 weeks is not. Ask for an expected finish date and an assurance that work will be done continuously. 7. What sort of disruption can I expect? Two painters or twenty? 8am start or 6am? Entire house a building site for months? Noxious oil paint fumes? Dust? Flakes? LOUD MUSIC? 8. What payment schedule should I expect? A small deposit is Ok. Periodic payments on long jobs are fair. Small businesses need prompt payment, so be ready on the agreed dates. Never pay in full in advance. So now you know what to ask, let’s talk! Call me, Tony Richardson – The Tidy Painter, on 0403 011 963. I’d love to help make your home look amazing again (with as little stress as possible). 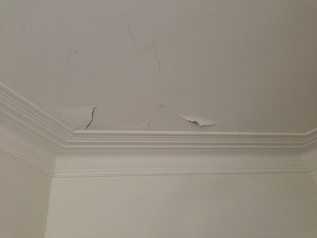 Older houses like those often found in Mosman and the Lower North Shore of Sydney, usually have 'Plaster and Lath' ceilings (rather than more modern Gyprock ceilings). Plaster and lath have many advantages but they after time they often develop cracks, crazing and peeling paint.
Making repairs to cracks and peeling paint requires a number of steps. If these are not carried out the repair could fail much earlier. 1. Protect the room. Remove small items, small furniture and pictures from the room. Move large items of furniture into the centre of the room and wrap in plastic. Apply masking tape and drop sheets to the floors. 2. Scrape loose paint. Peeling paint needs to be scraped away. Often small peels reveal more and more old paint that is hanging loosely and that will fail soon as well. So it all needs to be removed. 3. Seal craters. Where the loose paint flakes have come away the surface is often dusty and some edges may still be ready to lift. A solution of PVA glue (Bondcrete) should be painted on the craters and worked into the edges. It can also be applied to any fine crazing help make the whole surface strong. 4. Fill craters. The craters left by this scraping and any other holes, or dings need to be filled with a thin layer of plaster. After about 24 hours a second and possibly third coat of plaster needs to be applied (each taking a day or so to dry properly) 5. Vacuum Sand. Once fully dry the repairs need to be 'vacuum sanded'. This tool is a sander attached to an industrial vacuum that smooths the job and stops most of the dust landing on your furniture. Then a final light sweep removes the last of the dust. 6. Seal New Plaster. The new plaster should be sealed, again with PVA. This step is needed to stop paint coats absorbing differently in different sections of the ceiling. 7. Undercoat Sealed Plaster. The repaired sections are usually a different colour and need to be undercoated in white to visually even out the job. 8. Paint Ceiling. At last! we come to the painting part. Most repaired ceiling will need 2 good coats of flat (zero shine) white ceiling paint. Some people use a lighter version of the wall colour which is fine but it should still be flat. A brush works the paint into the decorated cornices and around the lights and smoke alarms. While a roller fills in the large flat areas. If Ceiling Repair and Painting sounds like a lot of hard work! (and you live on Sydney's lower North Shore), please click here and lets talk about a quote. 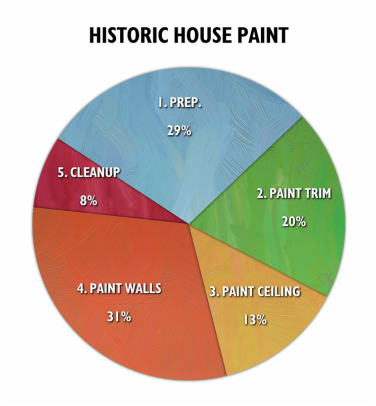 I've just finished a mega painting job. (And yes the client loved it. Thanks for asking.) Even I was surprised at how long the prep work took. (Prep. work is all the filling, sanding, vacuuming, washing, sweeping, and undercoating work that all paint jobs need.)
Like all nerds, I had recorded my time. Then being a visual person, I made a pie chart. NOW I could see what was going on! I was surprised to see that the prep and painting of the TRIM had taken 50% of my total time. Trim includes doors and frames, windows, skirting boards and in this case, picture rails: in short, the Timber bits. And every piece of timber was detailed and fancy. So, if you have a neat old house with all the decorative trim (even though the trim's surface area is small), prep. and painting the trim could cost as much as all the walls and ceilings combined. 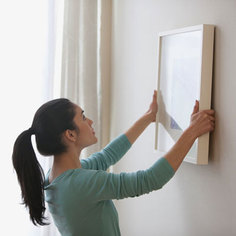 One of the jobs I am often asked to 'add to the list' is the installation of picture hooks. A trip to the hardware leaves many a strong person weak with the stress of choosing. But fear not! I'll tell you my trade secrets.
GYPROCK (PLASTERBOARD/DRYWALL) - This stuff is basically thick cardboard so care must be taken when putting up a picture in Gyprock. I use Wallmate Twist N Lock to create a good anchor in the soft plaster. There are lots of other systems, all trying to spread the load, but I often mangle the walls and stuff up the job, so Twist N Lock works best for me. Into this anchor I screw a regular screw passed through a Ramset Heavy Duty Wallhook. These guys will hold up to 10kg (Thats nearly all pictures and small to medium sized mirrors). Then the piccy is hung up and looks a million dollars. SOLID WALLS (BRICK, CONCRETE) - Usually pretty solid but you can strike a soft layer of mortar. So the idea is to drill fairly deep (ie.40mm) with a masonry drill. Into this hole I tap some red spaghetti. No not the food, the plastic wall anchor stuff. When I'm offered pre-molded anchors i usually just chuck them away because my spaghetti is longer, thicker and works the same every time. Then again I screw in a Wallhook as above. WHAT NOT TO DO. A lot of my clients fall for the sticky plastic all-in-one wall hooks available now. And then they call me to fix the mess! The removable ones are OK (I guess) if you are scared the landlord will keep your bond. But if its your house, don't bother, unless you want your pictures crashing to the ground all the time. Like a lot of convenience products these guys just fail about 50% of the time OR they stick so tight you pull chunks of plaster out when you remove them. The only time I go 'sticky' is with the two part 'velcro' type strips. These are good for very light and/or large piccys. Things that are mounted on polystyrene board for example. Also groups of pictures can be adjusted to line up. So, theres a lifetime of picture hanging advice. If this all sounds a bit stressful, I'd be glad to help. (But PLEASE make your picture hanging part of a longer list of jobs - that will keep me busy for a day or more.)  -I've just finished reading 'Bog Standard Business' by Charlie Mullins. Surely you've heard of him? The plumber to the Stars? The celebrity plumber? The millionaire plumber? (Aren't they all millionaires? Haha.)
It's one of the best plumbing books I ever read. (Again I jest.) Seriously though, its a great book tracking the rise of a poor kid who made it big - very big. 20-million-British-pounds-turnover big. His business, Pimlico Plumbers, is now London's largest 'service' business, with his own fleet of vans, 24 hour call centre, cafeteria, workshop, and in house marketing expert. He even has two PR firms on retainer. You may wonder what incredible technology or clever invention Charlie has used to become so successful. He claims his company's 'secret sauce' is to simply bring service, professionalism, cleanliness, and reliability to a trade that usually lacks all of those features. This warmed my heart because it's exactly what I'm trying do with HomeRite. And while I'm not quite at the 20 million mark (dollars or pounds), we do have one thing in common: He boasts a return customer rate of over 70%. And so do I. |
Was this info was helpful?Please leave a 5 star rating.
It's easy and fast!
Click the stars - no review needed. |
 RSS Feed
