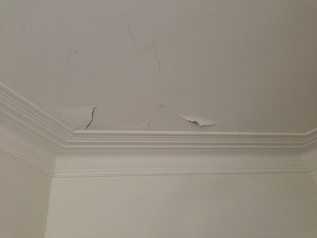
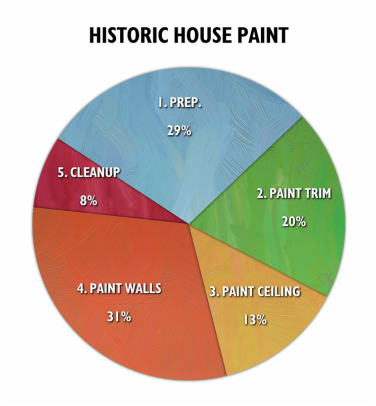
 Older houses like those often found in Mosman and the Lower North Shore of Sydney, usually have 'Plaster and Lath' ceilings (rather than more modern Gyprock ceilings). Plaster and lath have many advantages but they after time they often develop cracks, crazing and peeling paint. Making repairs to cracks and peeling paint requires a number of steps. If these are not carried out the repair could fail much earlier. 1. Protect the room. Remove small items, small furniture and pictures from the room. Move large items of furniture into the centre of the room and wrap in plastic. Apply masking tape and drop sheets to the floors. 2. Scrape loose paint. Peeling paint needs to be scraped away. Often small peels reveal more and more old paint that is hanging loosely and that will fail soon as well. So it all needs to be removed. 3. Seal craters. Where the loose paint flakes have come away the surface is often dusty and some edges may still be ready to lift. A solution of PVA glue (Bondcrete) should be painted on the craters and worked into the edges. It can also be applied to any fine crazing help make the whole surface strong. 4. Fill craters. The craters left by this scraping and any other holes, or dings need to be filled with a thin layer of plaster. After about 24 hours a second and possibly third coat of plaster needs to be applied (each taking a day or so to dry properly) 5. Vacuum Sand. Once fully dry the repairs need to be 'vacuum sanded'. This tool is a sander attached to an industrial vacuum that smooths the job and stops most of the dust landing on your furniture. Then a final light sweep removes the last of the dust. 6. Seal New Plaster. The new plaster should be sealed, again with PVA. This step is needed to stop paint coats absorbing differently in different sections of the ceiling. 7. Undercoat Sealed Plaster. The repaired sections are usually a different colour and need to be undercoated in white to visually even out the job. 8. Paint Ceiling. At last! we come to the painting part. Most repaired ceiling will need 2 good coats of flat (zero shine) white ceiling paint. Some people use a lighter version of the wall colour which is fine but it should still be flat. A brush works the paint into the decorated cornices and around the lights and smoke alarms. While a roller fills in the large flat areas. If Ceiling Repair and Painting sounds like a lot of hard work! (and you live on Sydney's lower North Shore), please click here and lets talk about a quote.  I've just finished a mega painting job. (And yes the client loved it. Thanks for asking.) Even I was surprised at how long the prep work took. (Prep. work is all the filling, sanding, vacuuming, washing, sweeping, and undercoating work that all paint jobs need.) Like all nerds, I had recorded my time. Then being a visual person, I made a pie chart. NOW I could see what was going on! I was surprised to see that the prep and painting of the TRIM had taken 50% of my total time. Trim includes doors and frames, windows, skirting boards and in this case, picture rails: in short, the Timber bits. And every piece of timber was detailed and fancy. So, if you have a neat old house with all the decorative trim (even though the trim's surface area is small), prep. and painting the trim could cost as much as all the walls and ceilings combined. |
Was this info was helpful?Please leave a 5 star rating.
It's easy and fast!
Click the stars - no review needed.
|
 RSS Feed
