|
Interior house painting can really improve you home. BUT it's harder than it looks. Many of my clients have started their interior painting project and discovered it takes much more time and effort than they thought. Don't believe 'The Block' or 'House Rules' with their overnight paint jobs.
Most people can do a pretty good job themselves ... if you don't skimp on the quality of materials and tools, or try to rush the process,. You just need to remember that: House painting takes a LONG TIME. House painting requires a LOT OF PREPARATION and set up. House painting requires a LOT OF EQUIPMENT. House painting requires QUALITY materials and tools. Here's how ... 1. PLANNING - 1 PAINTER = 1 ROOM = 1 WEEK Allow plenty of time. A good painter can paint a room in about a week. That includes prep., crack repair, scraping loose paint, and 2 coats of top coat paint on all walls, ceiling, doors, windows, skirting boards, and picture rails. So if you have 10 rooms (eg. Hall, 4 x bedrooms, 1 x kitchen that adjoins 1 family room, 1 x lounge room, 1 x dining room, 2 x bathrooms) it will take one good painter 10 weeks, or 2 painters 5 weeks, or 5 painters 2 weeks. 2. TOOLS - QUALITY TOOLS = QUALITY RESULTS. CHEAP JUNK TOOLS = CRAP RESULTS You will need: A step ladder - 5 or 6 steps Rollers and trays - sheepskin roller covers are best 6cm angled cutting brushes - 3 or 4 Plastic drops for furniture - NOT the floor Canvas or fabric floor drops Masking Tape - 3M Masking paper Plastic buckets - 2 Foam sanding block Selleys No More Gaps - for long corner cracks and gaps along skirting boards Selleys spacfiller for small holes 3. PAINT - DULUX FOR WALLS & OIL BASED TRIM - TAUBMANS FOR CEILINGS AND WATER BASED TRIM WALLS - Dulux Wash and Wear low sheen. (I've tried them all. Dulux W&W is the best for walls) Allow 1 litre for every 16 square metres of wall. Times 2 for 2 coats. Do NOT try to get away with only one coat. Just don't. CEILINGS - Taubmans Tradex White Flat Interior ceilings (better and cheaper than Dulux ceiling paint) 1 litre for every 16 square metres again. And 2 coats again. TRIM - (Doors, Windows, Skirting, Picture rails) - EITHER Dulux Super Enamel Semi Gloss (if you want oil based enamel) OR Taubmans Ultimate Enamel Alkyd Based Semi Gloss (if you want water based enamel). More info on oil and water based paint here. 4. EMPTY THE ROOM AS MUCH AS POSSIBLE Clear your work area. Remove blinds and move as much furniture as possible. Large furniture such as beds or chests of drawers can be walked (move one end a little bit at a time) to the centre of the room. You will need at least 80 cm clear space around all walls. 5. WRAP OR COVER EVERYTHING LEFT IN THE ROOM Protect, protect, protect. Wrap large furniture in plastic sheeting. Use high quality masking tape on your floors (carpet OR floor boards) where they meet the skirting boards. THEN use a strip of painters paper about 20 cm wide. THEN put fabric drop sheets on all floors. The floor and furniture should be completely covered. 6. REMOVE DUST Remove dust. Sweep or vacuum dust from the room edges, above doors and cupboards, along picture rails. 7. WET SAND Scrub all trim (doors, wooden windows, skirting, picture rails). The best way to clean AND sand is to use a good quality foam sanding block rinsed regularly in a mixture of water and sugar soap. This cleans any dirt AND sands the glossy surfaces. BUT the added advantage is that all paint dust sticks to the wet sanding sponge rather than turning into airborne dust. it is then rinsed out into a bucket. This is a great way to protect yourself from any residual lead paint in all old houses. 8. SCHEDULE - 2 ROOMS AT A TIME Try to work two rooms at a time. This allows you to always have something to do as a surface dries. 9. PAINTING ORDER The correct order of room painting is as follows: 1 - Cut (paint edges with a brush) the ceiling. 2 - Roll the ceiling. 3 - Cut Trim 4 - Cut the ceiling a second time. 5 - Roll the ceiling a second time. 6 - Cut the trim a second time. 7 - Cut walls. 8 - Rolls walls 9 - Cut walls a second time. 10 - Roll walls a second time. 10. VENTILATE AS MUCH AS POSSIBLE Ventilate, ventilate, ventilate. Fresh moving air helps painted surfaces dry faster and is good for your lungs. Some people are sensitive to paint fumes especially oil based paints, so ventilation is important. And thats it! House painting is really an exercise in patient, step by step, time consuming, application. If thats you, then go for it. If not I'd be glad to supply a quote. THE AD – Hi, I’m Tony Richardson, The Tidy Painter. I paint home interiors in Mosman, Cremorne and the Lower North Shore. If this article has made you think of hiring a SPECIALIST interior painter instead of doing it yourself, lets talk. CLICK HERE 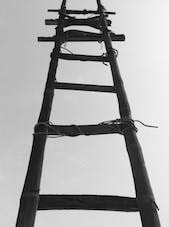 Recently on Facebook a Mosman man complained about a painter wanting to use (and charge for) scaffolding. The complainer thought a ladder would be just as good for painting, and not cost him nearly as much. He was being very brave with the painter’s life!
As a Mosman painter myself I’ve made the decision not to paint exteriors because of the dangers of height. But I still use a step-ladder inside and when I do I often think of Molly Meldrum. In 2011 Molly had climbed a ladder to put up Christmas decorations. He fell 3 metres onto concrete stairs, fractured his skull and nearly died. He had metal plates put in his skull, was in a coma and suffered months of amnesia. And it would appear that he has long-term problems resulting from the fall too. Every year nearly 5000 people in Australia are hospitalised from injuries resulting in ladder falls. Around 20 die. And the vast majority are men over 60. Only 20% of these falls are work related, meaning of course that 80% of falls are in the home. So men over 60, who get out the ladder at home to change a lightbulb do some painting need to be very, very careful. Most of my Mosman Painting clients fit this age profile so I’m very glad to help. But if you are going to use a ladder here are the 10 key ladder safety rules. 1.Make sure the ladder is not damaged. 2.Make sure the ladder base is on firm level surface. No slopes, no soft soil. 3.Make sure your step-ladder is secured into the ‘A’ shape it was designed for. 4.Make sure your extension ladder is secured at the top or bottom or is held firm by another person. 5.Extension ladders should be angled at 1:4. That means the base is 1 metre from the wall for every 4 metres of height. 6.Maintain 3 points of contact with the ladder. 2 hands one foot, 2 feet one hand. 7.Your maximum sideways lean should be as far as your belt buckle. 8.Do not climb higher than the second top rung or step. 9.Face the ladder as you climb down. Don’t climb down as though you were on a set of stairs. 10. Don’t multi-task, rush or carry too much up and down a ladder. And finally don’t let your pride get the better of you. I’m not as young as I used to be and my balance is not as good. So I use my ladder more slowly and carefully than ever. There’s no shame in paying an expert who uses a ladder every day to do your repairs or painting. It could save your life. THE AD – Hi, I’m Tony Richardson, The Tidy Painter. I paint home interiors in Mosman, Cremorne and the Lower North Shore. AND I’m very careful with ladders. If this article has made you think of hiring a ‘ladder aware’ interior painter instead of doing it yourself, lets talk. CLICK HERE Painting a ceiling is harder than it looks. For starters, everything in the whole room underneath has to be covered or moved. Small nick-nacks and paintings need to be moved to another room. Fabric groundsheets are good for covering floors and disposible plastic sheets can be wrapped around large bits of furniture that are too hard to move.
If you want talk to the painter who ONLY PAINTS INTERIORS (and you live on Sydney's Lower North Shore) click here. Then there’s the choice of paint. I used to used Dulux Ceiling White for most ceilings. Its good for going over a ceiling that is fairly white already, but its quite thin/watery. So, if you have a stained ceiling or one that has had a lot of plaster repairs, a more opaque paint is needed. For this I’d use Taubmans Tradex Flat White. http://www.taubmans.com.au/paints/tradex It is quite good at covering most ceilings. But when my friend Bahaa, who runs a local coffee shop, asked me to paint his ceiling I knew I needed the big guns. Imagine 20 years of commercial kitchen grease and gunk, lifted skywards and deposited on a white ceiling. I used the usual suspects but they didn’t cover very well at all. So then I tried my standard undercoat/blockout paint – Taubmans 3 in 1. It worked a treat – blocking out the mess and leaving a nice solid semi-flat white finish. http://www.taubmans.com.au/paints/taubmans-3-in-1 So I guess it goes to show that sometimes the ‘standard’ solutions are not always the best and that a little creativity in thought can give great results. By Tony Richardson - The Tidy Painter - Mosman, Cremorne and the Lower North Shore's favourite painter. Which brand of paint is the best for which job? People ask me this all the time. The answer is 'Horses for Courses'. I use Dulux ... and Taubmans .... and Zinsser depending on what's needed. Each brand has some real champions and a few ‘family members’ that let the side down quite a bit. (And not surprisingly, most cheap sub-brands, even with the Dulux or Taubmans name on them, are rubbish) Find the 5 interior paint colours that solve nearly all your problems. Click here. That’s why it’s a bit unfortunate that so many painting companies (usually the large ones) only use one brand of paint for everything. Bulk discounts are all very well, but shouldn’t the very best kind of paint be chosen for each particular job? The Tidy Painter (AKA Me) is locked into no such agreement and can pick and choose the best type of paint for every application. With that in mind I’ve developed a best in class list of paints that I use for my lucky, lucky clients. WALL PAINT Dulux Wash and Wear Low Sheen. The best known for a reason. In two coats it covers most existing wall colours. Marks and spills can be easily wiped off without leaving any marks. (Cheap paints will either leave a mark or rub off altogether!) CEILING PAINT Personally I don’t like Dulux’s ceiling paint. I find it surprisingly thin, transparent and watery. I much prefer Taubmans Tradex Flat Ceiling paint. It is thick and opaque and two coats cover most problems. TRIM PAINT Trim is the wooden stuff in your home – doors, windows, skirting and picture rails. When painting trim it’s very important to find out whether the existing surface has been painted in oil or acrylic based paint. Usually new oil goes over old oil and new acrylic goes over old acrylic. Oil based paint (AKA Enamel) is the toughest option but can ‘yellow’ over time. It smells strongly! And it takes a long time to dry (16hours) Water based trim paint (often confusingly called Enamel too) is softer, often needs more coats but does not ‘yellow’. It has a smell, but is a lot less strong. Its other disadvantage is that when painted directly over oil based surfaces without proper preparation, it peels right off! (Also many water based enamels are just bad.) So … I use both oil and acrylic ‘Trim’ paint as needed. These are the ones I’ve found work best: OIL BASED TRIM PAINT – Dulux Super Enamel WATER BASED TRIM PAINT – Dulux Aquanamel * UPDATE - I have a new page that really gets into Low VOC and low odour painting. UNDERCOAT Undercoat is a colour blockout. Usually I’m going over previous paint work so undercoat is not needed. But sometimes a light top coat over a dark or strong existing colour needs a base of undercoat. Also undercoat is needed over new Gyproc plaster board, in renovations etc. I use Taubmans Tradex Ultra Prep Undercoat PRIMER Primer is different to undercoat. While it too is a colour blockout, it’s primary functions are to GRIP and SEAL. Primer is painted over bare timber (to seal up the pores), over repairs and fillers again to seal, and before acrylic is painted over old oil based trim. Here I use a product from an American Primer/Undercoat specialist manufacturer, called Zinsser. It’s a bit smelly but that evaporates within a few hours. I use Zinsser CoverStain Primer Sealer Stain Killer *UPDATE - Here's a new blog post that really gets into primers and sealers. EXTERIOR PAINT And finally, even though I hardly do any exterior painting at all, its good for you to know that there are specialist paints for outdoors. In Australia because of the extremes of weather and temperature, outdoor paints need to have quite different properties to indoor paints. They need to be able to stretch and contract as the substrate (brick, concrete, timber) expands and contracts. As a result good outdoor paint is very ‘rubbery’ even when fully cured. The best I’ve found is Dulux Weathershield. So now you can see why there is no ‘best brand’ of paint. In my professional opinion eight kinds of paint from 3 manufacturers will cover 99% of situations. Some are harder to apply than others, but whether you get me or another pro to apply them, I’m sure you’ll be happy with the results. Was this info helpful? If so, please leave a 5 star rating. Its easy and fast. No review needed. Are you looking for an expert interior painter in the lower north shore? Maybe I can help.  Here's a system for choosing a wall colour that is radically different to the usual approach. It's especially useful when many rooms are to be painted and you don't want to stuff it up. And best of all you get a very accurate idea of how the colour will work. Read on ... FORGET SMALL SAMPLES When choosing a wall colour it’s standard practice to paint a patch ranging in size from an a4 page to a square metre. Most people have a shortlist of colours (and sometimes a long list) on the wall. And they look at the patches then choose. BIG MISTAKE! I’ve been doing it myself for years and guess what? It doesn’t work! Too many clients who were happy with the small test patch HATE the finished room. Because the effect of a finished painted room bears NO resemblance to a colour patch on a wall. Here’s why … 1. The new colour patch floats in a sea of your old wall colour. It is dominated by your existing wall colour. Colours are highly influenced by the surrounding colour. So a wee patch of cool grey on a wall painted yellowy cream will look uber-cold … by comparison. And the old colour doesn’t matter. It shouldn’t be there influencing the new one. Thanks old colour, its been great but, sorry. Its time to scram. 2. A fully painted room is like swimming in that new colour. It surrounds you, so the effect is completely different to looking at a little a4 sized patch on the wall. 3. A newly painted room with brilliant, sharp, clean, white trim and ceiling FRAMES the new colour differently to your old, faded, chipped, existing, trim and ceiling. 4. Sunlight. That’s right, light behaves differently on different walls. So the wee patch in full sunlight will look different in a dark corner. Whats to be done? PAINT ONE ROOM 1. Collect a selection of those the tiny postage stamp sized colour samples from Bunnings or another paint supplier and gradually winnow them down to no more than 3 that are probably going to be OK. 2. Get sample pots and put an a4 patch on the wall. Pardon? Didn’t you just say don’t do that? Yes I did. But this is just a disaster check. The tiny weeny postage stamp chips look much stronger and darker when painted a bit bigger. This process is aimed at eliminating any crazy ones now. 3. Ok so maybe you are now down to two colours. Choose one. I’m guessing they will be so close your friends wont be able to tell the difference. So choose one. 4. Get your friendly, local, painter (who you have met, received a fixed written quote from and who you have awarded the job) to paint ONE ROOM in the chosen wall colour with the chosen trim colour (usually semi gloss white). A 4 litre can will usually do one bedroom in two coats. THEN 5. This is how your chosen colour works in real life, on 4 walls, with sunlight. Stand in the room and decide … if it is the colour you expected …if it makes you feel the way you wanted it to make you feel … if you like it! NOW IS THE TIME TO DECIDE. Is this the colour you want through the whole house? 6. If you do like it, ask the painter to order what he needs and get cracking! If you do not like it, ask yourself why. Is it a grey that looks too blue? Is it an off white that looks too bland? Is it a colour that is far darker than you pictured? Find some little chips that are less blue/less bland/less dark and start the whole process again. The trim and ceiling have already been done so the painter only needs another 4 litre can of wall paint (and of course the extra labour – maybe an extra day?) And you don’t have 20 litres of the wrong paint sitting around. Give it a try. I think you’ll find this system works better. By Tony Richardson - The Tidy Painter - Mosman, Cremorne and the Lower North Shore's favourite painter. 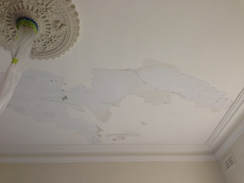 How to fix cracks in walls and ceilings before they are painted. There are several TYPES of cracks. Each needs a slightly different approach to repair. I've listed the main types below and how to fix them. OLD HOMES Ceilings - plaster and lath - Wet plaster was originally squeezed over and between thin timber slats creating a smooth but strong surface. Over time age or movement cracks the plaster. Falling Chunks - If the damage is very bad and the plaster is unstable and falling off then a specialist trade plasterer will be needed. He will remove all unstable plaster and re apply new wet plaster. This is a complex, messy and expensive process but done properly will last another 100 years. Oh, and it will still need to be painted. Stable but cracked – Usually plaster and lath ceilings hold on pretty well but over time begin to crack into separate but stable sections. These cracks should be repaired as they look bad and gradually get worse. Wall Cracks – The internal walls of old Sydney homes are nearly always masonry (brick, concrete, stone, rubble!) covered in a cement render, which is in turn covered in wet plaster. Wall cracks occur when your home moves slightly on its foundations. Sometimes the soil under your home shrinks and expands with natural water and weather. Sometimes there is a problem that needs to be fixed such as a broken pipe. Cracks also often appear after renovations, jack hammering, and adjacent tile removal. NEW HOMES Ceiling and Wall cracks – The ceiling AND walls of modern homes are nearly all lined in drywall or Gyprock sheeting. This material is very smooth, cheap and fast to install. It is used in the cheapest and most expensive homes. Almost anyone can attach the sheets but ‘setting’ or plastering the joins is a specialised trade. The cracks that appear in drywall are usually above doors and anywhere where small sections are butt joined together. Foundation movement can also create cracks. For old and new homes and ceiling and wall repair, the crack repair process is the same. It takes a few days but is very effective. CRACK REPAIR 1. First any loose plaster in the crack should be scraped out. 2. Then all loose paint must be removed. Often a small peel or crack will give way to huge sheets of old paint that easily peel of. 3. Usually after the loose paint is removed a layer of fine dust remains. This must be vacuumed or washed off. 4. Once done I like to paint the damaged area with a sealer such as Peel Stop. This sealer binds any remaining dust, seeps under the sound paint edge, and also seeps into the crack to start the repair. 5. Next if the crack is wider than 1mm it should be filled with No More Gaps, which acts as a filler and additional adhesive. 6. Then a strip of Drywall Tape and plaster compound is applied. There are 3 kinds of tape – paper, fibreglass mesh and fibreglass mat (I prefer fibreglass mat). These tapes are designed to join and smooth modern Gyprock or Drywall sheets but make perfect ‘bandages’ for crack repair. The Tape + Compound patch must be left 24 hours to completely dry and cure. 7/8. The Tape will still be visible so 2 more coats of compound have to be applied, again waiting 12 hours between each coat. If the crack is part of a ‘crater’ left by removing old paint this crater should be skimmed and smoothed with compound at the same time. 9. Getting a perfect smooth finish can be quite hard. The best way is to gradually build up 3 thin layers waiting 12 hours each time. When the final layer is cured it can be smoothed by a. a quick scrape of flat edged tool, b. sanding, or c. wiping with a slightly dampened cloth. 10. The whole smooth repair is painted with another coat of Peel Bond. It is very important to seal the plaster. If regular paint is applied over raw plaster compound the paint will fail within a few months. 11/12/13. At least two coats of good quality paint should be applied over the repair. Sometimes a third coat is necessary because repair shows through. CORNICE REPAIR Cornice is the plaster moulding that covers and decorates where the wall joins the ceiling. With the movements discussed above, the join can often crack. Cornice cracks are nearly always between cornice and ceiling or between cornice and wall and are therefore concave or internal, rather than the flat surfaces of walls or ceilings. Concave repairs are best done with a product called No More Gaps. No More Gaps (or its equivalent made by other manufacturers) is squeezed out of a tube or caulking gun, a bit like toothpaste. It is then smoothed with a wet rag. It has the benefits of being fast drying, flexible, paintable and a pretty decent adhesive. BUT it shrinks! So its fine for concave repairs but on any smooth surface it sinks as it dries. So that’s how you repair a cracked ceiling or wall. Just remember that a small crack or paint peel may reveal a much larger crack under the loose paint. With the right materials, process and patience, an ugly crack can be banished for many years to come.  CLICK HERE TO MEET SYDNEY'S BEST CRACK REPAIR & INTERIOR PAINTING SPECIALIST! How long does it take to paint a unit or house interior?
Have you ever had a go at painting a house or even just a room? Takes forever doesn’t it? Even we professionals (with all the tools, materials and experience) take a long time to paint home interiors. I measure that time in ‘man-days’ (even though most of my assistants are women!) So me painting for 5 days is 5 man-days. Me PLUS one assistant painting for 5 days is 10 man days. AGE OF YOUR HOME As I bang on about all over this website, age of home, and therefore detail of home is the HUGE differentiator, as is surface condition. Pre 1960 Older homes (both units and houses) are usually much more detailed. Think, panel doors, wooden windows, detailed skirting boards, picture rails, higher and moulded ceilings, and sometimes moulded plaster arches in the hallway. This extra detail takes extra time and costs extra money. Post 1960 Everything is planer and flatter and therefore easier and faster to prep and paint. Interestingly, ALL ages of home have about the same amount of general damage that must be properly repaired before painting starts. The problems are different but both old and new units and houses have just as many problems. HOW LONG? So depending on age and condition: A 4 Bedroom, 2 bathroom home should take between 30 and 40 man-days (or 6 to 8 weeks alone – less with a helper). A 2 bedroom, 1 bathroom unit should take between 10 and 15 man-days (or 2 to 3 weeks alone - less with a helper). TIMING - RULE OF THUMB A good rule of thumb is for every $5000 quoted you SHOULD get about 10 man-days (after materials and GST is taken out). This helps when comparing quotes too. A $10,000 quote will mean one painter will work on your home for 20 days, while it’s competitive quote of $8000 will mean one painter will work for only 16 days. (Hmmm. I wonder what he will leave out?) To find out what interior painting COSTS CLICK HERE. By Tony Richardson - The Tidy Painter - Mosman, Cremorne and the Lower North Shore's favourite painter.  1. State your budget before the quote
Hardly anyone does this (although everyone decides after getting the quote if its above or below their budget!). But, hey, you never know. The timing, length of job, location, whatever, might be just right for your painter. They might have a slow period that your lower priced job could slot into. 2. Negotiate after the quote. And hardly anyone does this either! The important thing is not to ask for the same work for less money. If the quote is higher than you can afford, just ask what would need to change to make it cheaper. You might be surprised. Maybe leaving out a small but fiddly part could save the painter time and you money. I know only painting the walls and not the trim will save a lot of money. 3. Break it up. Painting every room inside can be expensive and take ages. A lot of my clients have me in to do say 3 or 4 rooms one time then come back a few months/years later. - Go away. I mean on a holiday. It saves time and money to leave the bedroom fully covered in dropsheets over the 3 to 4 days needed to paint a bedroom. Being absent also gives opportunity for we painters to work on the weekends. 4. Empty the house. Not usually practical, but if you’re planning to refinish your timber floors or are just about to move into a new house, emptiness is next to Godliness. BUT plan ahead!!! I’ve had to turn down far too many people who want me to paint their 4 bedroom home next week (and only take a week). 5. Be flexible on timing. Either wait for the good people to be free (they are usually booked up months in advance) or if you have a smallish job, wait for a gap in bigger bookings. I had one nice man wait months for me to have a gap to do a 3 day job. 6. Keep the colour scheme simple. White ceilings, white trim and one wall colour is a standard palette. Lots of different coloured room looks great but will cost more. Also going from an old dark wall colour to a new light wall colour will require either a third coat or an additional undercoat. That’s more money. 7. Don’t choose the cheapest quote. What? Who? How does that save money I hear you ask. Simples. The cheapest quote will almost certainly have the worst (or non existent preparation) and as such will fail much faster and need to redone much sooner. True story: I have spent the last 3 days scraping and sanding a bad Acrylic paint job over Oil – a front door and 2 windows. There was no sanding, no primer, no nothing, so the Acryic paint didn’t grip. You could peel the paint off with your fingernails!!!! So now the client pays me say $1500 to fix up a $100 ‘el-cheapo’ job. That’s $1600 by going cheap instead of $500 to do it properly in the first place. I believe they call that a false economy. What does NOT save you money? 8. Buying your own paint. Paint (and tape, brushes, everything) makes up about 10% of the total quote. Most painters get a small discount and either mark back up to retail or pass the saving on to you. Sooooo you buying at retail price is just a damned nuisance for you and doesn’t save a penny. Don’t bother. 9. Helping. Seriously a lot of guys will walk if you offer to help them. Firstly there are insurance issues. Secondly painting may look easy-peasy but its not. Thirdly your helping will slow the process and therefore cost more. The only help that might actually help is for you to do the prep. BEFORE the painters arrive. Sanding and scrubbing with sugar soap is grubby and time consuming. So if you are prepared to do that part you could save a lot!!! Ok. Hope that helps. Now, if you want to know what it costs to paint a unit or house interior CLICK HERE. By Tony Richardson - The Tidy Painter - Mosman, Cremorne and the Lower North Shore's favourite painter.  We’d all like to live in a world where ALL tradesmen (and tradeswomen) were super-professional and keen to earn our dollar. But sadly this is often not the case. Some tradies (just like any other occupation) are just duds. They hate their job and should have left years ago. You definitely don’t want them. Some are good at the craft/skill/trade, but are hopeless at calendars, deadlines, time management, and communication. You probably don’t want them either. And some are intelligent, skilled, organised, polite, professional people. Those are the ones you want, right? But heres the rub. The good ones are rare and in high demand. So it should come as no surprise that to catch a good tradie you may have to dig a bit more, pay a bit more and wait a bit longer. But I can almost guarantee you wont end up sobbing on A Current Affair. (Here, I’m mostly talking about home improvement guys - builders, painters, landscapers, bathroom and kitchen renovators and the like) rather than emergency guys - plumbers, electricians etc.) Research - Do get references, from Google, Websites, Friends, or Facebook community groups. Try to only call a tradie when you have at least one reference. - Do check out the tradie’s website. Look through it and get an idea of what they do and who their customers are. - Don’t look for generalists. You need a specialist. Wrong - “I need a painter.” Right – “I need a painter who specialises in strata work and has done buildings similar to my unit block.” The initial phone call - Do leave a phone message. A drag I know, but good tradies have their hands full but will call you back. The ones that don’t call back are either far too busy or are disorganised. Either way, you’ve avoided exactly who you want to avoid! - Do try to be clear about what you want. Leaving a message that says “Can you call me about some painting” will never get the response of “We need walls, ceilings, and trim painted for 4 bedrooms, a hall, and a bathroom.” - Don’t say your job is small or won’t take long. All that tells us is you don’t plan to spend much money - whether the job is indeed small or is actually more complicated than it looks. - Do ask if what you need is what the tradie can help you with, and when he would be free to start. Initial meeting - Do get your story straight with your husband/wife/partner. Being the bystander in a domestic dispute is awkward and tells me this job could collapse at any time. - Do take your time showing the tradie what needs to be done. Then leave him alone to measure up and get a good understanding of your home. - Do follow your gut – ladies I’m talking to you. How does he look? Is he on time? Does he listen? Does he have ideas? If you have ANY uncomfortable feelings cross that tradie off your list. The quote - Do ask when you can expect the quote, how long the job will take and when is the tradie is free to start. - Do get 2 quotes but make sure they are for exactly the same work and materials. - Do read every part of the quote when it arrives. You need to be very clear about what you are getting. Some quotes have tiny extras sections that could add thousand to the final price. Some seem nice and cheap but have left out essential preparation or other tasks. - Don’t just think about the price. Within reason, choose the tradie that you think will give you the best job and the best experience while he’s doing it. Is he keen? Is he polite? Will his process be disruptive? - Do contact some past clients and see what they say. Seriously hardly anyone does this! - Do respond to the quote. Yes – call and agree a start time. No – email thanks but no thanks. Maybe – call or email asking how a saving could be made. And that’s it! If you follow these do’s and don’ts you have a very good chance of success -not guaranteed, but very good. Good Luck! By Tony Richardson - The Tidy Painter - Mosman, Cremorne and the Lower North Shore's favourite painter.
|
Was this info was helpful?Please leave a 5 star rating.
It's easy and fast!
Click the stars - no review needed. |
 RSS Feed
